Purpose
Functionality for attic spaces includes room info, tie beam info, how floor of attic is created, and attic loading. Attics can be habitable or non-habitable, and loading is set accordingly. Multiple attics can be added to a single truss.

- Create a new truss or open an existing truss and click Attic. To access this dialog from the Layout view, go to Truss Modifications > Attic.
The Attic dialog displays.
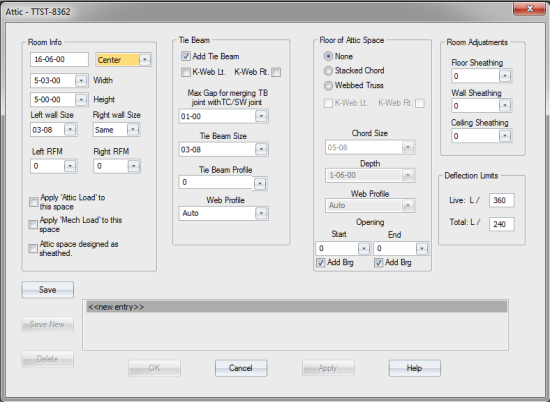
2. Define attic settings. See Attic Options below for information.
 Note that you can select an existing Attic setting, make changes and click Save New to save it as a new setting.
Attic Options
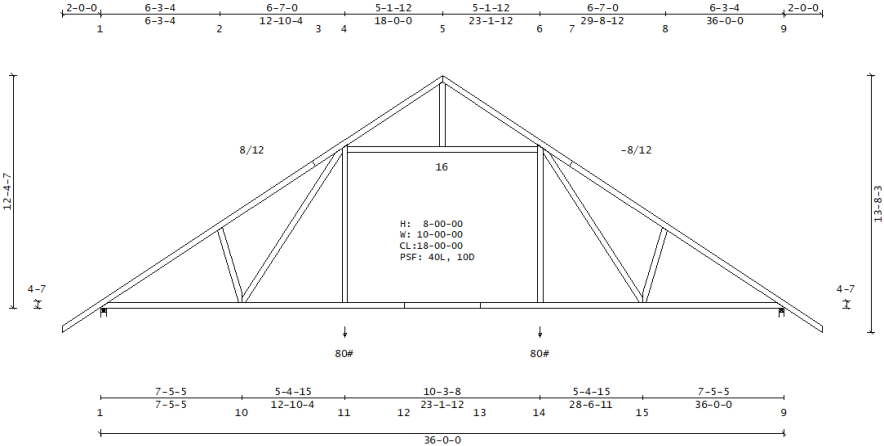
Room Info
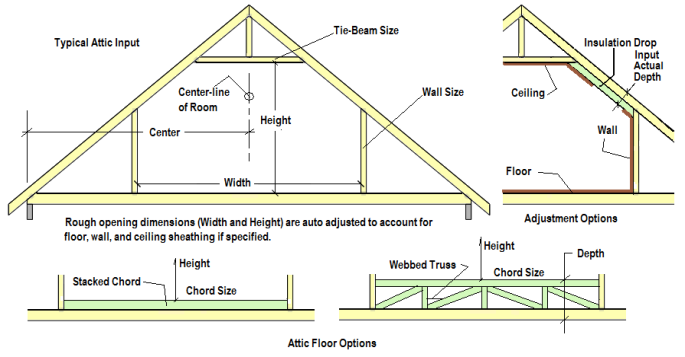
- Enter a dimension in the first box to indicate where the attic room is located, from the left end of the truss. For example, 16-00-00. To locate the attic room from the right end of the truss, enter the < symbol before the dimension. For example, <16-00-00.
- Center, Left, Right - Select the relative location for the attic room from the dropdown list.
- Width - Define the width of the attic room by selecting a dimension from the drop-down list or by entering a dimension in ffiiss. The max width is 80% of span.
- Height - Define the height of the attic room by selecting a dimension from the drop-down list or by entering a dimension in ffiiss. You can also choose the Auto option to automatically place the tie beam (uses left side wall and double cuts tie beam at that location and goes straight across to the right).
- Left wall Size / Right wall size - Define the size of the side walls by selecting a board size from the drop-down list. Available sizes are: 02-08, 03-08, 05-08, 07-04, 09-04, 11-04. For Right wall Size you can select Same to match whatever is selected for the left wall.
-
Left RFM / Right RFM (Room Filler Member) allows you to add structural room filler members (sometimes called haunch or reinforcing blocks). Add RFMs by selecting a dimension from the drop-down list(s). RFMs are plated to the top chord(s) per the dimension set in EnvData>Geometry > PanelLengths_2xW_ParallelMembers > StackedChords - Max length between plates. Note: In order to place a non-structural RFM, use Filler or Add Board. Non-structural plates (NS+) are required to be placed at certain intervals along the new member.
- Apply Attic Load to this space - Turn attic loading on/off using this check box. The attic loading values are set in the Load Template Manager window.
- Apply Mech Load to this space - Turn mechanical loading on/off using this check box. See Apply Loads for Mechanical Device .
- Attic space designed as sheathed - When unchecked, Truss Studio designs the attic space to require bracing and indicate the required number of braces, as needed; on the TDD it will indicate that either sheathing or bracing is required. The default (and preferred setting) is False (unchecked). When checked, the assumption is that the attic space will be sheathed during construction. A note displays on the TDD indicating that the space must be sheathed.
Note that you define attic loading on the Load Template Manager window and apply attic loads on the Attic window.
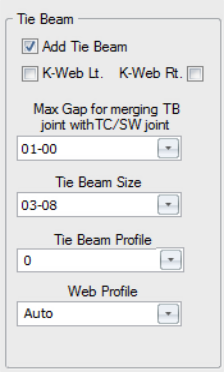
Tie Beam options
Define tie beam options in this section of the dialog.
-
Add Tie Beam (Collar Tie) - Choose whether to add a tie beam by clicking the check box. To delete a tie beam, you must uncheck this box.
- K-Web Lt. / K-Web Rt.
- for Tie Beam Joints on Sidewall - If the tie beam is low enough to intersect the side walls instead of the top chords, k-webs can be added for triangulation.
- Checking one box also works well for symmetrical attics.
-
Max Gap for merging TB joint with TC/SW joint - If the tie beam ties into the top chords instead of the side walls, you can set a max gap distance between the two joints. If the gap distance, based on the vertical projection, is less than the setting, the two joints are treated as one for plating and engineering purposes.
Note: When the vertical webs forming the attic space walls share the same joint as the collar tie/tie beam, the joints may combine, adjusting the room size. If this occurs and is not desired, adjust the Env Data setting for Test Limit for merging TB join with TC/SW joint to 0 in order to maintain the room size.
- Tie Beam size - Define size of the tie beam by selecting a board size from the drop-down list. Available sizes are: 02-08, 03-08, 05-08, 07-04, 09-04, 11-04.
- Tie Beam Profile - Add additional webs to tie beam area. For example, you can vault a tie beam to a top chord peak joint. This option is generally used for mechanical rooms, but can be used for any attic as long as the resulting truss passes analysis.
Tie beam profile options include:
Connect wall tops (SC) = TTS command for single cut
Connect wall tops (DC) = TTD command for double cut
Flat (default) = 0 or blank
Vault to Peak = CP command
# & FFIISS = pitch for distance (i.e., 4 2)
# and e = mono pitch to right wall (i.e., 2 e)
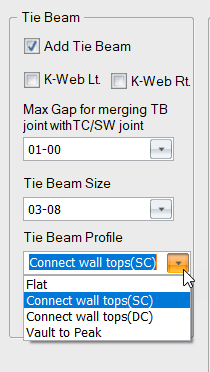
All commands provide automatic symmetry as long as the description does not go beyond the centerline of the room. Incomplete descriptions will automatically be completed with a flat member.
- Web Profile - Defines how webbing over the beam is handled:
None - Use this option if webbing over the tie beam is not desired.
Auto - For this option, Truss Studio determines the best way to web over the tie beam.
Web pattern - Define the webbing over the tie beam by selecting a web pattern from the drop-down list or by entering it manually. You can define the tie beam by inputting the number of panels in each segment, starting with the top left segment, and moving clockwise.
- Max Gap for merging TB joint with TC/SW joint - If the tie beam ties into the top chords instead of the side walls, you can set a max gap distance between the two joints. If the gap distance, based on the vertical projection, is less than the setting, the two joints are treated as one for plating and engineering purposes.
Floor of Attic Space
Define the floor of the attic using these options:
- Stacked Chord - If this is selected, the Chord Size option is enabled and you can select a chord size for the stacked chord or the top chord of the floor truss.
- Webbed Truss - If this is selected, the K-web, Chord Size, Depth, and Web Profile options are enabled
- Chord Size - Select a Chord Size from the drop down list displayed.
- Depth - Select a depth for the floor truss by selecting a dimension from the drop down list or by entering a dimension in ffiiss.
- Web Profile - Select Auto or another option from the drop down list
- K-Web Lt. / K-Web Rt. - check to K-web to the floor member on the left or the right
-
Opening - used to add a stairway opening to the attic space. Specify a start and ending location for the opening and add bearings.
Note: When defining an attic space floor opening for the entire section of the attic space, no room loading is applied, while wall and ceiling loads remain. A warning message displays, Attic floor has been removed - no room loading is applied.
You can make adjustments for drywall, sheathing and other items by selecting a dimension from the drop down list. Any values entered are added to the room dimensions.
- Floor Sheathing - This adjustment is added to the room height
- Wall Sheathing - This adjustment is added to both sides, so the value is multiplied by two and added to room width
- Ceiling Sheathing - This adjustment is added to the room height
Note that these settings apply only to the floor section of the attic. For overall truss deflection control settings, see the Env Data settings for Deflection Control Roof and Deflection Control Floor.
3. Click Apply to apply changes and keep the window open so you can continue working. Click OK to close the window.
Set this feature in EnvData > UserInterface > DisplayControl > Display Attic Living Space Loads
Notes:
- You can easily flip attic webs by selecting the webs and clicking
 .
.

- When creating multiple attic spaces, the order in which they are input is important. The first space input takes precedence over subsequently defined attic spaces.
-
When the Attic command has been added to Additional Cmds
-
When you create an attic room using the Attic dialog, Truss Studio clears out any webs in the designated space and creates an attic room and webbing as specified on the dialog. This means you can create a truss and later add an attic room; Truss Studio will make all the necessary adjustments for the newly added attic space. The attic command is added to Additional Cmds.